Thursday, December 23, 2010

Simple Christmas Decor

Well the Holidays are here and have come upon me way too quickly.  I'm not as prepared as I should be, the past couple of months have been a whirl wind of change in my house.  Life had thrown me challenges that I didn't quite know how to handle, I'm finding my way and have learned the Lord is a great light if I let him lead.  I had officially fallen off the Earth to some, but now I'm back better than ever.  

We have Simple Christmas Decor ideas to get us back on track, here are a few of my favorite things.... :)

Christmas Reflections

Ornaments can be hung just about anywhere and add such holiday glam!


Winter Wonderland

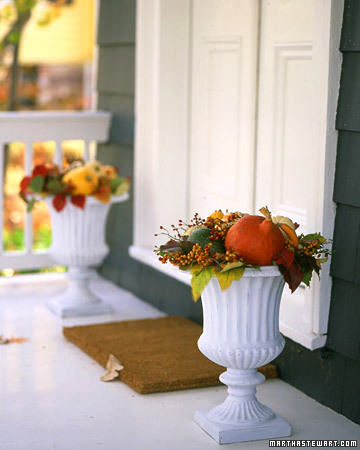
It's a Winter Wonderland using all white with pops of Christmas color. Planters are filled with ornaments here for inexpensive holiday decorating.


Making It Monochromatic

Monochromatic adds dramatic holiday style in this picture.  Green custard cups are surrounded by green, sparkly ornaments on a silver tray.  The floating candles are an awesome final touch and illuminate the arrangement beautifully. 


Wrought iron chandelier with frosted ornaments and red ribbons

Red-satin ribbons and ornaments add Glamour to a dining room chandelier. Simple, quick and in-expensive. :)


candles in bowl with silver balls

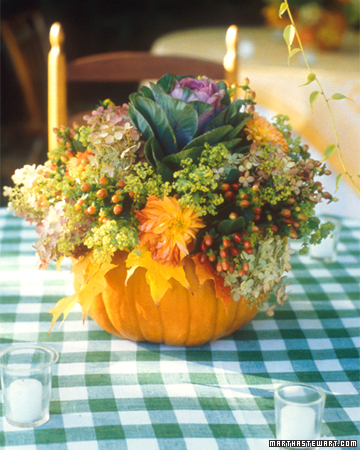
Such a sophisticated centerpiece and oh so fancy, look again. :)  It's a kitchen bowl filled with your everyday candles, throw in some silver holiday balls and silver bead decor.... Bam! Instant Glam!  Love it.


Red tulips in a pot

Holiday ornament flower pots are cute and add a great splash of color. 


More Candy canes in small silver mug
Better Homes & Gardens Pics
Candy canes in a silver container, simple and classy.

I hope your Holidays are happy, healthy and full of Love.

God Bless.


Tuesday, October 12, 2010

It's Fall Y'all

I just love it when you think you have life all figured out and God gives you a life lesson to let you know you don't! :)  He has a way of helping you put your life back into perspective and refocusing real quick like. I have learned when the Lord calls I listen up the first time. Sooo with that being said, once again, I am apologizing for my MIA status the last few weeks. So don't mind me if I rattle on aimlessly on occasion... :) 


So now lets get on to the good stuff... FALL!! Woo hoo!! Honestly, that doesn't mean much in Arizona, except it might be 96 degrees instead of 116 degrees. :) I will take it! I do get decorate with fall colors though, my favorite!! 


Here are some of my favs :)
Fall Leaf Garland
Williams-Sonoma Wreath


Autumn Sunflower Wreath


Martha Stewart.com


Chalkboard Rock Vase Filler, Set of 4
Pottery Barn-chalk board rock filler fun

Oversized Urn, Black
Pottery Barn- Urn with Gourds

Cranberry Vase Filler, 3.2 oz.
Simple but cute- hurricanes filled with cranberries & candle. You could do any fall colored filler and use candles or pinecones.

Cranberry Vase Filler, 3.2 oz.
Pottery Barn has awesome ideas for inspiration :)

Pomegranate Feather Wreath, 30"
Love this- pomegranate wreath

I hope you feel a little fall inspiration & get started on your decorating if you haven't already.  Happy decorating~ xo Julie

Wednesday, September 15, 2010

One Day Makeovers~ Redesigns

I'm often asked what is a Redesign? 


Basically a Redesign is taking what you already own and giving your space a fresh new look with it. My goal in the process is to help you have a home that tells your story with the things you already own and love.


Pic Credit


It's so exciting to offer a change for a client who is frustrated with the look they have and want it to feel "complete" or "just right". Often times these Makeovers or Redesign clients have an additional small budget to work with for updating some accessories (toss pillows, throws, candles, wall art) or additional pieces they may have wanted. If they don't that's ok, getting creative and shopping your home for a new look is so much fun. We can help with paint color selection, furniture, carpet and any other need you may have! Most Redesigns are typically done in a day while the client is away at work, running errands or whatever!


Imagine the surprise when you walk in to a fresh new space you love~
The Before

The client leaves and the room is cleared for a fresh slate to work with.

This Makeover client wants new paint~ not usually the case on one day Redesigns

The clients wish list included a new rug


This is how the clients new "story" for her room begins~ new purchase mixed with the things she already owns.

Let the placement & accessorizing begin!
Hanging her Wall Art

Now call the Client to return, we are ready for the big Reveal!!!! 
So that's the basics~ hope you have a better picture of how things work for Redesign~Makeover Day! :)

Please feel free to give us a call should you like a Consultation for your own Redesign or perhaps a Consult for a list of helpful hints and ideas for a space you need help with. If you don't live in the Phoenix Metro area feel free to contact us about our E~Design option.

Julie Rogers
Bella Redesign
480.239.9047

Let us help you fall in love with your home all over again.

Monday, September 13, 2010

Dreaming


So I've been MIA for almost two weeks... sorry for not keeping up the posts! Life happens to just take over sometimes with four kiddos, a new dog, my oldest going to Homecoming, two little ones birthday parties, teenage girl problems, projects to complete and consults, mounds of laundry and lots of other Mommy jobs. :) I would not know how to live without chaos! So join me as I dream of peaceful places, happy thoughts to settle my nerves today. 


How fun it would be to run in a field of flowers... carefree... wind in my hair... eww... except for the mosquitos... ok, ok, back to my dream...
I'm wishing the weather were cooler here for some gardening...

or maybe I could build my own Tree Cathedral like the one in Italy.
tree cathedral bergamo italy

Well this would be lovely too, if I didn't live in the desert. Hmm...


I think I may nap, or at least think about it. :) xoxo


Monday, August 30, 2010

I love Inspirational Makeovers

If you have ever read the magazine Guideposts, you have heard of their Designer, cute Kelee Katillac. She has recently created a beautiful bedroom makeover for a cancer patient.
This is a hospital bed!
Kelee has done an amazing job on this room with a very tiny budget and I just had to share! Please go over to the Katillac Shack and check out the video. It's so worth the watch!

Sweet Collette was told she has less than a 15% chance to live, our prayer for her is that she will go into remission and heal swiftly. Please check out her story.

Let us all count our blessings and give thanks to our Lord above.~
Julie xox

Saturday, August 28, 2010

Perfect Picture Hanging

Photograph ©2000-2003 by Glenna J. Morton, About's Interior Decorating Guide
NSO Decorator's Show house

I get asked this all the time... How do I hang a picture correctly? While there are standard "rules", it truly does just have to look alright. It's not a game of  perfection, if it feels good when you look at it, it's probably ok.


Here's some thoughts to get you started:


If the space includes a large wall and a lot of floor space, start by arranging the artwork on the floor first. Measure how far they need to be from one another. Then take one at a time and put them up on the wall.


Another option is to make a template of each piece to be hung. Just trace around the outside of the frame on kraft paper or newspaper and cut out the shape.
Secure the templates to the wall with reusable adhesive, which looks a bit like putty or chewing gum. It won't tear pieces from the wall or the paper patterns. You can also carefully use scotch tape in a pinch. :)
Consider grouping four small same-size pictures together in a four-square, to give the illusion of a larger picture.
There doesn't always have to be four in a group. Consider using a larger picture in the center. Then place two smaller pictures on either side of the large picture, spaced vertically to about equal the length of the larger frame. Or, in place of the larger picture, use a large mirror.
Not all frames will always be matching sizes, so approximate and just try to balance the impact of the frames -- not match them perfectly.
Always hang pictures at about eye level for an average height person.
If hanging a picture over a sofa, don't leave a lot of wall space between sofa and picture. Try for three to six inches. If you go any higher, the viewer's eye will just go to the wall, not the picture.
Photograph ©2000-2003 by Glenna J. Morton, About's Interior Decorating Guide
Don't put one little picture on a large wall, it looks ridiculous. If there's not enough artwork to fill up more space on a large wall, consider putting mirrors or a shadowbox in the grouping. On that note, don't overload a small wall with a large picture. So to be clear, choose smaller pictures for narrow walls and larger pieces for larger walls. :)
In general, when hanging art over furniture it should never be longer than the width of the furniture. The rule is typically never larger than 75% of the furniture width.
More tips to come! Hope you're having an awesome weekend!
Julie xoxo

Monday, August 23, 2010

Little Details Make the Difference

{Country Living Photo}

I love all the little details that can help bring a space together. I enjoy doing all the "extras" for my clients, but somehow always have it on my "to do" list for my own home. :)  
Take these vinegar bottles, plain bottles transformed with a  rub-on label (from Hambly Studios). Potions and lotions are so much lovelier displayed this way, don’t you think? 
A small touch, a little detail that makes life beautiful.
xox Julie